|
Installation, configuration and use of the XE-Filter
international spam email blocking software are very
straight-forward processes. This "How-To"
documentation page is presented as a brief overview,
familiarizing the user with these operations
 Click on thumbnails for more detailed explanations.
|
|
|
|
Installing XE-Filter
|
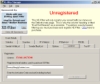
The Unregistered XE-Filter |
Click for details
After downloading, XE-Filter is ready to be installed on either the Exchange Server
or IIS SMTP gateway, whichever is the point of entry for inbound Internet email.
Read XE-Filter requirements...
 For existing customers:
Upgrading to the latest
version
For existing customers:
Upgrading to the latest
version
|

Click to enlarge
All XE-Filters are initially installed in an "Unregistered" state. In
this mode, email traffic can be monitored but no filtering can occur.
To move beyond this edition, an XE-Filter license must
be purchased.
|
|
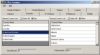
Activating
XE-Filter |
Configuring and Controlling XE-Filter |
Click to enlarge
With the purchase of XE-Filter, a message is sent to the
buyers email address containing an "Activation Code"
This is entered into fields under the "License" tab to
unlock the full functionality of XE-Filter. |
Click to enlarge
Define the criteria to customize the XE-Filter installation:
- Specify banned and allowed countries
- Upload IP white and black lists
- Create sender white and blacklists
- Manage DNSBL
- Manage event logs
|
|
Publishing Results to the Internet |
Archiving and Clearing Results |
|
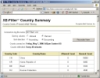
Click to enlarge
Real-time country-of-origin statistics can
automatically and easily be published and viewed on the internet by any browser.
|
Click to enlarge
Use the Windows Task Scheduler to automatically archive
and clear the XML file holding XE-Filter results
statistics.
|


