![]() Warning:
Warning:
|
You should not attempt to perform the installation remotely via technologies such as Windows Remote Desktop (formerly Terminal Services) or similar remote control products. Doing so may cause the wrong security settings to be used and Praetor may function incorrectly or erratically. Even Microsoft's own Service Pack 4 for MSDE cannot be installed using a Remote Desktop client! Also, recording a CDR with the downloaded Praetor files will not allow you to perform the installation directly from the read-only CDR. You must copy the files onto your local drive and run the SETUP from that location. |
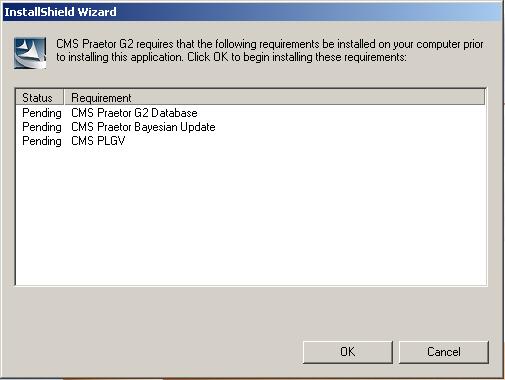
This chapter describes the installation process for the different scenarios possible, all of which will be performed automatically by the Praetor installer. However, before the main Praetor filter can be installed, the installer will check to verify that other components are present and performs the following:
Update the Bayesian database with the default word list
Install PLGV, the Personal Log Viewer web application
This can be seen in the following initial screen.
After pressing  the installer then begins to check if
you have the requisite
Microsoft components also installed and that you are logged
in with administrator privileges. Should
the Praetor installer determine that you are missing either the .NET Framework
v1.1 or a local SQL Server (e.g. the free Microsoft SQL Desktop Engine
or MSDE), then it will download those components from the Microsoft website
and install them. This
can be seen in this sample screen
with SQL Server missing.
the installer then begins to check if
you have the requisite
Microsoft components also installed and that you are logged
in with administrator privileges. Should
the Praetor installer determine that you are missing either the .NET Framework
v1.1 or a local SQL Server (e.g. the free Microsoft SQL Desktop Engine
or MSDE), then it will download those components from the Microsoft website
and install them. This
can be seen in this sample screen
with SQL Server missing.
To avoid this long download from within the Praetor installer, CMS strongly recommends that you have these Microsoft components already installed before attempting to install Praetor. You can find the download links here.
|
When upgrading from Praetor v1.5, CMS recommends that you get a new machine with Windows machine. In this way you can introduce it into your existing email stream transparently. If you insist on installing Praetor G2 on your existing Windows 2000/XP-based Praetor v1.5 machine, you would need to:
|
Please click on the pictured links below for your selected process.
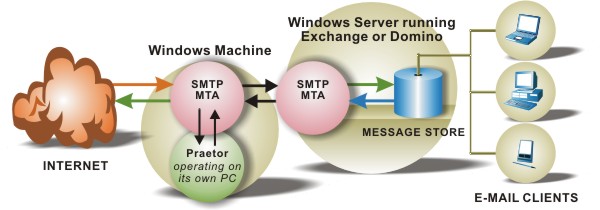
Installing
Praetor on a standalone Windows machine (recommended)
This is also applicable for Exchange v5.5 and any non-Windows 2000
based mail systems including Lotus Domino, Novell GroupWise, Sendmail,
or other SMTP mail server. In
this configuration Praetor can filter both
inbound and outbound email.
For a discussion why CMS recommends this, click here.
Installing
Praetor directly on the Exchange 2000 or 2003 server
In this configuration Praetor can filter only
inbound email.

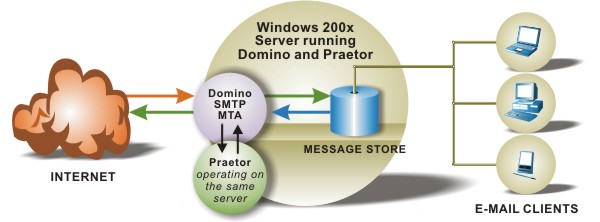
Installing
Praetor directly on a Windows 2000-based Domino server
In this configuration Praetor can filter only
inbound email.