The message log can be seen by selecting the container under Message Logs in the left pane of the Praetor administration program component as shown below.
![]() Note:
Note:
|
The displayed list are limited to 32,000 most recent entries taken from the last 48 hours. |
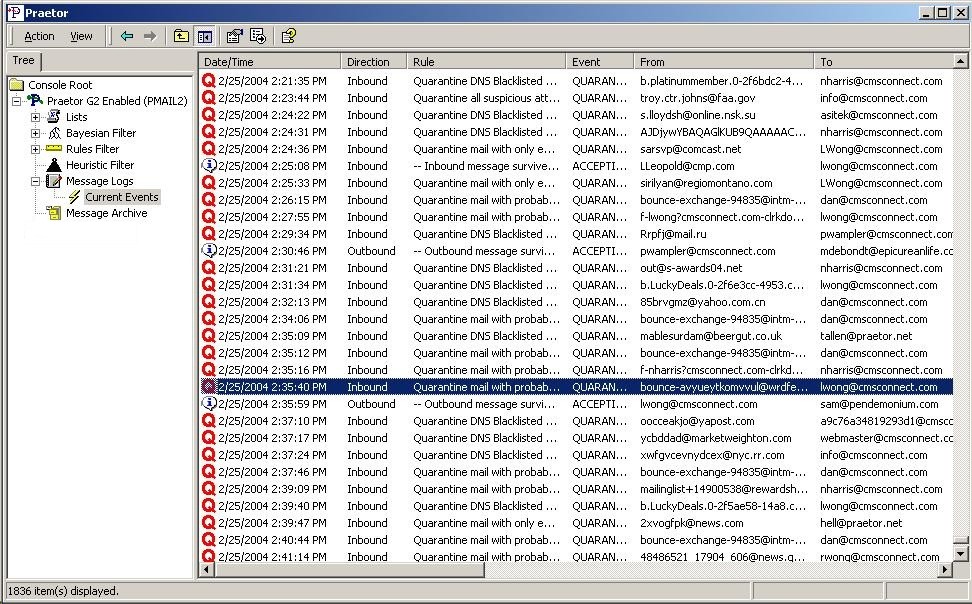
Log Viewer opening screen
As you can see, the log shows several columns that summarize each message that passed through Praetor.
Disposition icon representing the following:
|
|
Informational only, the message was accepted and is no longer available. |
|
|
Quarantined message, available for review. |
|
|
Informational only, former quarantined message that has been reviewed and disposed (released or rejected). |
|
|
Informational only, the message was rejected and is no longer available. |
|
|
Forwarded message, only summary information is available for review. |
Date and time stamp
Message direction
Rule that was triggered
Main action event for the rule
Sender address (may be fictitious)
Recipient address
Subject
![]() Note:
Note:
|
Columns may be re-sized by placing the cursor on the vertical title bar separator which then changes the cursor, and dragging it left or right to the desired width. Alternatively, place the cursor on the vertical bar until it changes to the re-size cursor, and double-click causing the column to adjust to the largest size needed for the widest entry in that column. Since this is a dynamic real-time list of messages handled by Praetor, the view is always in chronological order and the columns cannot be sorted. Use the Find capabilities to narrow your search and provide a static snapshot report. This report allows sorting on specific columns. |
To open any message, simply highlight the entry line and double-click. A dialog box will appear that shows you details about your message and which rule, if any, was triggered. This message information includes the following fields:
|
Field item |
Description |
|
Message ID |
Unique filename given to the actual message file. |
|
Rule |
Name given to the rule which was triggered by the email. |
|
From |
From address in the RFC-821 message envelope. |
|
To |
First intended recipient in the RFC-821 message envelope. |
|
Subject |
Subject line in the RFC-822 message header. |
|
Size |
File size of the message in its raw form with any attachments still encoded. |
|
Reason |
Information to give more details about the triggered rule that caused the message to be quarantined. |
If the message under review was not quarantined, then you will be presented with a summary screen that appears like the following.
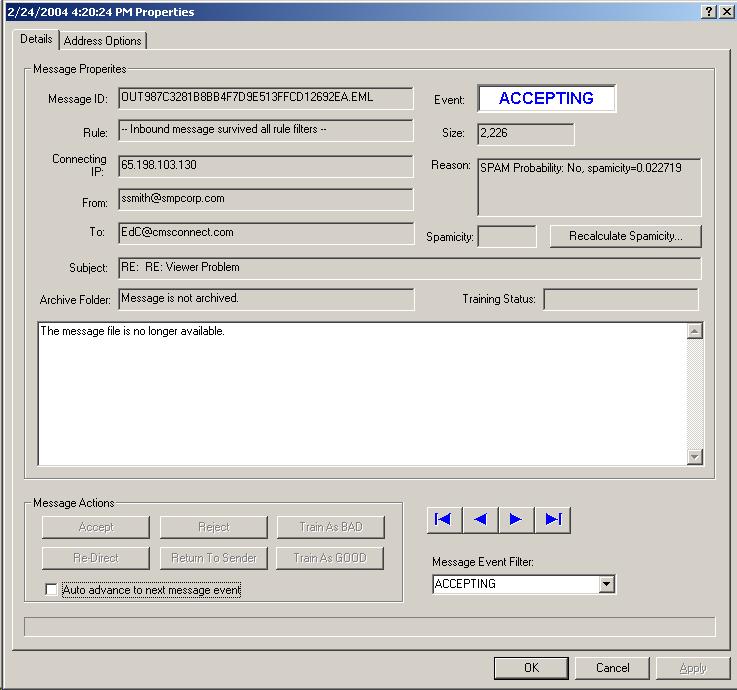
Note that the message details area is empty except for "The message file is no longer available.", and all buttons in the Message Actions group box are grayed out. This is due to the fact that the message was not caught by Praetor and it was sent to the intended recipient, so the details are not available.
![]() Note:
Note:
|
If you had set to archive messages, then the details will be displayed since a copy still remains, even though it was accepted and sent to the intended recipient. |
If the message entry being double clicked was quarantined and marked
with the disposition icon ![]() then the display appears with
more information available, including the specific reason why the message
was quarantined, the connecting IP address of the sending mail host, etc.
then the display appears with
more information available, including the specific reason why the message
was quarantined, the connecting IP address of the sending mail host, etc.
Notice the scrollable region in the lower portion of the dialog box. This area contains the details of the actual quarantined message starting with the Internet message headers per RFC 2822. Also notice that the buttons in the Message Actions group are now enabled.
Just as in the actions normally associated with Praetor rules, there are several message actions for you to choose in dealing with the quarantined messages. The actions buttons that may be pressed to dispose on the message are mutually exclusive:
|
Causes Praetor to deliver the message to its intended recipient |
|
Deletes the message |
|
Delivers the message to a different address than intended | |
|
Returns the entire message to the sender | |
|
Optional training buttons: |
|
|
Analyzes the message and updates the spam tokens used by the Bayesian filter |
|
Analyzes the message and updates the non-spam tokens used by the Bayesian filter |
The first two actions for accepting and rejecting are self-explanatory. The Redirect and Return to sender requires more information from the person who is reviewing this quarantined message. Click the links provided above to see a discussion on those actions. In fact, returning to the sender takes advantage of pre-existing templates on the Praetor machine. Click here to read how these can be set up, either on the Praetor machine or the remote Log Viewer machine.
Pressing either of the two train buttons causes the message under review to be analyzed, broken into their tokens, and update the Bayesian filter token database by incrementing the token count as spam or ham (non-spam or good messages). These optional training actions do not close the review window and you can still dispose of the message by selecting any one of the four main message actions.
For your convenience, the checkbox is provided so that after viewing and deciding on the disposition of each quarantined message, the next quarantined message is automatically displayed. Thus the navigational buttons do not need to be pressed when this checkbox is selected.
Press  when you are done reviewing this message.
These navigation buttons will jump to the message according to the type shown as the Message Event Filter. Normally this type is set according to the message being reviewed, though you may change it. The navigation buttons will proceed to the message with that specific event type.
Here are the various meanings for the buttons you see.
|
|
First |
|
|
Previous |
|
|
Next |
|
|
Last |
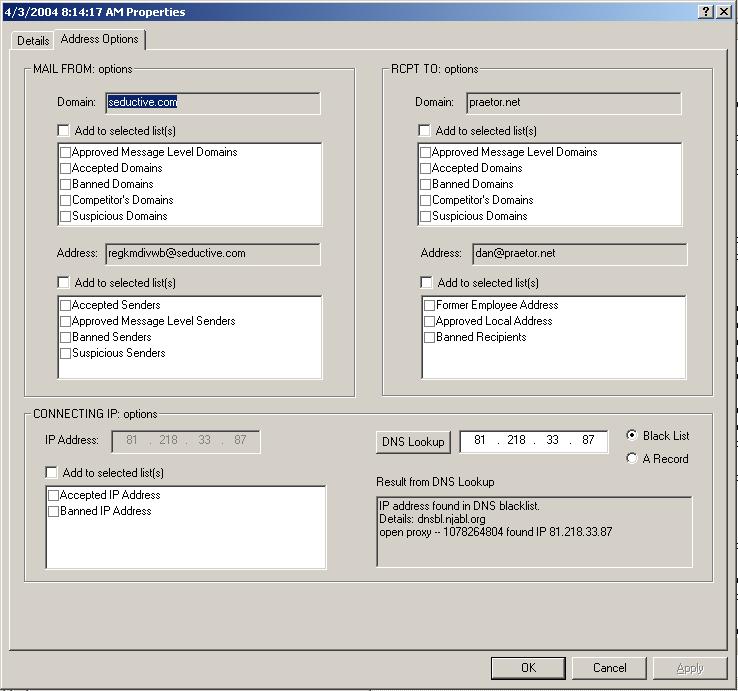
The Address Options tab page is shown for any message whose details are available. This facility allows you to now add domain and IP addresses to the various lists shown.
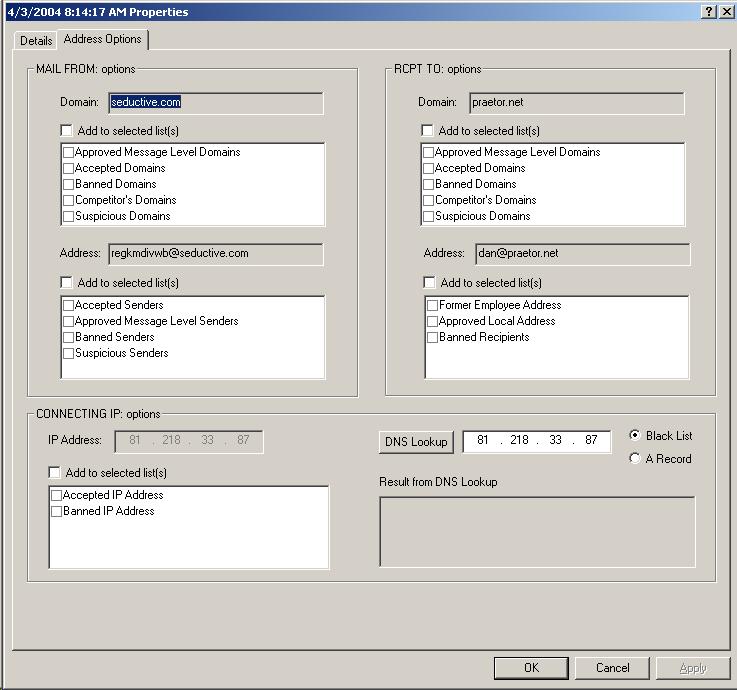
Many times quarantined messages may contain sender address or domains,
connecting the IP address, or other information that you may want to place
into various lists. It
is in this window where you may do so by checking the box(es) for your
selections and pressing .
Pressing  in the lower left permits you to check on the
IP address of the mail server that sent this message to Praetor. You
may perform either a blacklist lookup using the specified DNS
Blackhole list servers, or an A record lookup to your normal DNS servers.
in the lower left permits you to check on the
IP address of the mail server that sent this message to Praetor. You
may perform either a blacklist lookup using the specified DNS
Blackhole list servers, or an A record lookup to your normal DNS servers.